Showing posts with label Breads. Show all posts

Friday, 24 April 2015

Whole-Grain Blueberry Scones � Because a �Muffsconut� Isn�t a Thing

I was brainstorming some ideas for using up a cup of nearly perfect blueberries, and was waffling between muffins, donuts, and biscuits. I finally decided on a biscuit-like triangle, spiced subtly with essence of old-fashioned donut.

I�m calling it a scone because I cut it into a triangle. There�s just something un-American about a triangular biscuit, so you Brits will just have to keep a stiff upper lip about this not being an actual scone.

I used my new favorite, sprouted spelt flour, but I�m guessing this will work with whatever you roll with. You�ll also want to keep an eye on them in the oven, as the baking times will vary depending on the exact shape and thickness. They�re done when they�re well browned, and you see blueberry juices bubbling out through the top and sides.

These have that someone loves me look, especially if you do the recommended sugar-crust top, which is why I�m thinking these would be nice for Mother�s Day, or any other brunch/breakfast-in-bed type situations. I hope you give these a try soon. Enjoy!


Ingredients for 8 Whole-Grain Blueberry Scones:
2 cups spelt flour
1 1/2 tsp baking powder
1/4 tsp baking soda
3/4 tsp fine salt
1/8 tsp cinnamon
1/8 tsp freshly grated nutmeg
2 tbsp white sugar, optional
4 ounces ice cold butter (1/2 cup aka 1 stick) 
1 cup blueberries
3/4 cup cold buttermilk
- 425F.for about 20-25 minutes, or until well-browned and blueberry juices start bubbling out through the top and sides.

Tuesday, 10 March 2015

Irish Soda Bread � Better Than a Pot of Gold

St. Patrick�s Day is right around the corner, and what better way to celebrate than with a loaf or two of Irish soda bread? If made correctly, this is one of the best quick breads (those leavened without yeast) you�ll ever have. Subtly sweet, with a light, tender crumb, and not at all dry. 

Done wrong, it�s worse than not having any at all. I�ve had some that were not only dry and crumbly, but had such a strong chemical aftertaste, I wondered if I was being poisoned. Okay, so I�m a bit paranoid, but the point is, this is not one of those recipes loaded with spoonfuls of baking powder and soda.

We�re using just enough soda to react with the acid in the buttermilk, and then hedging our bets with a teaspoon of baking powder. That�s really all you need. Speaking of buttermilk, this is one of those recipes, where you can substitute with your own homemade equivalent. Just use the same amount of whole milk, but add 1 tablespoon, plus 2 teaspoons, of either lemon juice or white vinegar to the wet ingredients. It�s the tanginess and acid we need, so that will work just about the same.

By the way, if you�re not into the more breakfasty version I did here, this is very simple to convert into a savory bread. Leave out the dried fruit, maybe cut down the honey a little, and you�ll have something wonderful to serve with soups and stews. I hope you give this a try very soon. Enjoy!


Makes 2 loaves of Irish Soda Bread:
3 1/4 cups all-purpose flour
1/2 cup whole wheat flour
1/4 cup quick-cooking oatmeal or regular rolled oats
1 1/4 teaspoon baking soda (make sure it�s fresh)
1 teaspoon baking powder (make sure it�s fresh)
1 1/2 teaspoon salt
4 tablespoons very cold unsalted butter, cubed
2 or 3 tablespoons honey
1 3/4 cups buttermilk
1 large egg
2 teaspoons orange zest
1 cup dried currants
1/3 cup gold raisins

Friday, 9 January 2015

Bluetons (Blue Cheese Croutons) � Trademark Pending

As promised, here are the blue cheese croutons you saw floating on top of the roasted apple and parsnip soup we posted yesterday. They were just perfect together, and as I ate my soup, dozens of other, �perfect togethers,� easily came to mind.

We only use three ingredients here, which is why this works so well. Try to resist the temptation to add salt, pepper, or other spices, as the blue cheese will provide all the punch you need. We�re going for pure blue cheese flavor in a buttery, crunchy package, and anything else would just get in the way.

Another tip here is to use bread that�s not too stale. I find that dry bread makes a crispy-hard crouton; verses fresher bread, which has more crispy-brittle texture. You can file that one under theories I can�t prove, but don�t need to.

The type of blue cheese really doesn�t matter to the technique, but the sharper, and more intense the flavor, the better. Like I always say, you're the boss, so use whatever you like. Speaking of which, Michele gets credit for the, "Louis Vuitton of your blue cheese crouton" line. I was going to go with "the Chef John of..." but hers was much better.

I guessed at some amounts below, but you don�t need those, since this is simply as much butter and cheese as you feel comfortable with. I hope you give these blue cheese croutons a try soon. Enjoy!


Ingredients for 8 portions Blue Cheese Croutons:
1/2 loaf fresh or day old bread (try to use something not already dry and hard)
5-6 tbsp hot melted unsalted butter
2-3 ounces strong blue cheese, placed in freezer until firm
*bake at 350 F. until browned and crisp. 

Monday, 17 November 2014

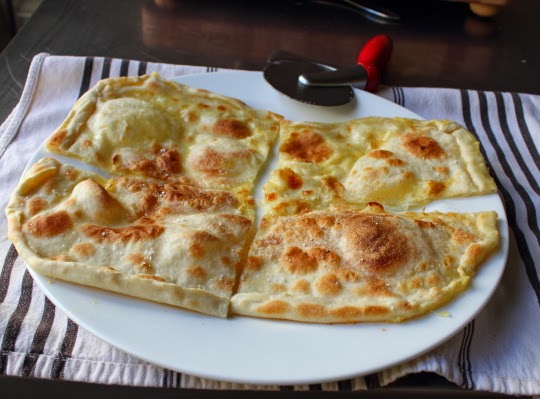
Homemade Flatbread � If You Have Flour, You Have Bread

As I�m sure you�ve heard by now, possibly in our last post, today is National Homemade Bread Day. So, I decided to do a flatbread video, demonstrating what was probably the world�s first wheat-based bread.

It never ceases to amaze me how a little flour and water can be transformed into such delicious, gorgeous bread, and in just a matter of minutes at that. Inspired by the thought of these earliest flatbreads, I went with about half wheat flour and half all-purpose, as well as a little spoon of corn meal for some extra texture. 

I�ll be giving no ingredient amounts below. Flatbread�s not like that. Combine water, flour and a pinch or two of salt; and mix together as shown until you have a soft, sticky dough. That�s it. The other key is to use a very hot cast iron pan or griddle. You can wipe the surface with a tiny bit of vegetable oil, but basically a dry pan works the best.

If you�re not in a hurry, wrap your dough and let it sit on the counter top for an hour or two. This will give the flour time to hydrate, which will provide a little nicer texture. Having said that, I didn�t wait at all, and mine came out fine.

So, if you�re interested in making flatbread like they did when people thought the earth was flat, then I hope you  get this easy and delicious technique a try soon. Enjoy!

Sunday, 16 November 2014

Lose Weight and Live Longer with the New Homemade Bread Diet!

Word on the street is that tomorrow, November 17th, is National Homemade Bread Day, and to celebrate I thought I'd post a few of our most popular, and critically acclaimed videos. By the way, I have this idea for a diet where you get to eat bread, but only if you bake it fresh yourself. 

Since most of us are fairly lazy, this would become maybe a once a week thing, which has to be a better alternative than that daily dosage of supermarket, pain d'preservative. It's still in the brainstorming stage, and there's no book deal yet, but I'll keep you posted. In the meantime, go make some homemade bread. Click on the title to see the original post, and as always, enjoy! 


No-Knead Beer Bread


You like beer. You like bread. So, what are you waiting for? Pro Tip: Even though you only need one beer, get a six-pack.

Perfect French Baguette


This is the video French bakers don't want you to see. People don't think they can make bakery-quality loaves at home, but those people are wrong.

No-Knead Ciabatta


One of the most popular Food Wishes videos of all time. If you've never made bread, this is the recipe for you. Warning: The dough is going to be sticky. Don't be afraid.

Pita Bread


What this amazing bread lacks in height, it more than makes up for in stuffability. And yes, that is a word.

Thursday, 13 November 2014

How to Make Puff Pastry Shells � Vol au Venting!

As promised, here�s the video for how to make your own puff pastry shells, or vol au vents, as they'd be called in France, and select U.S. locations. These are fairly simple to make, and once baked the real fun begins, as they can hold so many amazing fillings, both sweet and savory.

The key is making sure your puff pastry dough is very firm, and very cold, preferably still partially frozen, before you start cutting it. You want nice clean cuts, because if you mash the layers of pastry together, your shells will not rise as high, and they can also bake into some strange shapes. Having said that, even though I was filming, and working way too slowly, these still came out pretty well.

Once they�re filled they look great, so it�s not that big of a deal, but in general, the colder the dough, the nicer the final product. Other than being too rough with the dough, the other common mistake is under cooking. Your shells might look beautiful at 15 minutes, but may still be kind of raw inside. As long as the outside is not getting too dark, don�t be afraid to let them bake a bit longer.

Regarding the scraps. You can�t re-roll the trimmed puff pastry and have the shells come out the same, but what you can do is cut it into irregular shapes, egg wash it, and dust with cinnamon and sugar. Once baked to a crispy, golden-brown, you�ll have a great little sweet treat to serve with coffee or tea. I hope you give this easy and fun technique a try very soon. Enjoy!

Tuesday, 21 October 2014

Beef on Weck, Part 1: The Kummelweck Roll � You�ll Be Thirsty for More

Welcome to the first of a two-part series on one of this country�s most delicious unknown sandwiches, the "Beef on Weck." This simple, but brilliant creation features thinly sliced, horseradish covered, roast beef, piled high on a freshly baked kummelweck.

The roll's fragrant caraway seeds and coarse salt are a perfect accent, and when you add a steaming ramekin of fresh beef jus for dunking, you�ll understand why this is the pride of Western New York. Sorry, chicken wings.

As legend has it, a pub owner in Buffalo, New York created the sandwich, hoping the salty rolls made by a local German baker would help increase drink sales. That sounds about right, and I do have it on very good authority that beef on weck works well with beer.

So, even if you�re not into roast beef, I still recommend you give these great sandwich rolls a try soon. And, if you are into roast beef sandwiches, I invite you to stay tuned for what I believe is America�s finest example. Enjoy!


Ingredients for 12 Kummelweck Rolls:
1 envelope active dry yeast (2 1/4 tsp)
1 cup warm water (105 F.)
2 tbsp vegetable oil
1 tbsp sugar
1 1/2 tsp salt
1 large egg white
1 generous tsp honey
*3 1/4 cups all-purpose flour total (use 1/2 cup with yeast and water to start recipe)

* I mentioned a dough tip during the video, and that has to do with not adding all the flour at once. I like to add about 80% of the flour called for, and then continue adding small amounts as the dough kneads, until I have the perfect texture.  You want a soft, fairly sticky dough that pulls off the sides of the bowl clean.

For the topping:
1 large egg white beaten with 2 tsp water
coarse grain sea salt
caraway seed

- Bake at 425 F. for 18-20 minutes

Wednesday, 15 October 2014

Dutch Babies � Almost as Easy to Make as Real Babies!

I had my first "Dutch Baby" in Chicago a few years ago, and have wanted to do a video on them ever since. I�ve always been fascinated by how many different breakfast foods you can create using just milk, eggs, and flour; and this is one of the more interesting examples. Especially considering the unusual, and borderline disturbing name.

Sometimes called �German pancakes,� these have very little to do with Germany, and nothing to do with the Dutch. Apparently they were invented by German immigrants who were referred to as �Dutch;� a corruption of the word �deutsch.� So, save your emails saying they don�t have these in Germany or the Netherlands. We know.  

As I mentioned briefly in the video, I like to use a little less batter than many recipes call for. I think this provides the best crispy-to-custardy ratio. I topped mine with butter, lemon, and powdered sugar, but any and all traditional pancake toppings will work wonderfully. I hope you give these beautiful �babies� a try soon. Enjoy!


Ingredients for 4 small or 2 large portions:
3 large room temperature eggs
2/3 cup room temperature milk
packed 1/2 cup flour (really pack the measuring cup firmly with flour)
1/4 tsp vanilla extract
1/4 tsp salt
3 tbsp clarified butter
- Bake at 425 F. 20-25 min
* garnish with melted butter, fresh lemon juice (Meyer if you can find it), and powdered sugar.

Thursday, 25 September 2014

Crostini Dijonnaise � Mustard-Infused Toasts for Extra Special Spreads

If you�re going to serve your pate or rillettes with toasted bread and mustard anyway, why not save a step, and just make mustard-flavored crostini? That�s the question I asked myself while making the potted duck spread we just posted, and this was the answer. 

For a first attempt I was very happy with the results. These had the same crispy crunch of traditional crostini, but also offered a fairly noticeable, mustardy zing.


I�m looking forward to trying some variations using hot mustard powder, maybe mixed into a little olive oil. Speaking of oil, my only criticism is that these needed a little more fat. Next time I�ll use a little more of the butter spread, and/or drizzle in some olive oil to insure we don�t have any dry spots.

That aside, I loved the color, and as we head into entertaining season, I think these would make a great addition to your appetizer arsenal, especially when paired with something as extra special as a batch of homemade rillettes (hint, hint). I really hope you give these a try soon. Enjoy!


Ingredients for one baguette:
1 baguette, sliced diagonally
4 tbsp soft butter
2 tbsp Dijon mustard
1 tbsp yellow mustard
salt, freshly ground black pepper, and cayenne to taste
- bake at 350 F. until crisp and golden brown
(Next time I may try to add a few tablespoons of olive oil, and a pinch of mustard powder to the mix)

Monday, 18 August 2014

Under My Panzanella, ella, ella, ella�

I�ve never been a big fan of panzanella salad. I love the flavors in the dish, but stale, soggy bread just isn�t something I crave. The sogginess is understandable, as this dish was invented as a way to ingest rock-hard bread, but now that we�re just making it for fun, and not to avoid starvation, we can tweak a few things for texture�s sake.

The key is frying the bread cubes in loads of olive oil, in a skillet, which obviously makes them crispy, but the healthful fat also soaks in and renders them semi-waterproof, or should I say dressing-proof. The same goes for the dusting of Parmesan we apply halfway through.

You may be tempted to save some work and bake them in the oven, but don�t. By using the pan, you get nice, crispy surfaces, but the very center of the crouton stays just a touch chewy. The oven tends to dry the bread out, and you don�t get the same texture.

The gorgeous pool of tomato juices, oil, and wine vinegar will still soak in, and soften the bread, but you�ll still get a little crunch in each bite. For me this makes all the difference in the world. I know adding things like peppers, onions, and cucumbers is quite common, but I think they simply get in the way.

Having said that, it�s your �little swamp,� which is what �Panzanella� translates to, so throw in what you like. Speaking of which, I�m not giving ingredient amounts. I�ll give a ratio, and maybe a recommendation or two, but this isn�t the kind of recipe where you should be washing measuring cups and spoons. Taste and adust, and as always, enjoy!


Ingredients:
(I like equal parts bread cubes to tomato salad)

For the bread:
stale bread, cut into 1/2-inch cubes, soaked well with olive oil
enough finely grated Parmigiano Reggiano to cover bread
-- fry until crispy and browned

For the tomato salad:
cherry tomatoes, halved
salt and pepper to taste
pinch of sugar
a little minced garlic
equal parts red wine vinegar and olive oil, to dress generously (add enough to create a very �swampy� mixture)
freshly sliced basil

Monday, 19 May 2014

Classic Split Top Hot Dog Buns � How We Should Be Rolling

When we posted our hamburger bun video last year, I received a bunch of requests for hot dog buns. My first thought was, just take the same dough and shape it into logs instead of rounds. I mean, come on�how hard is that? Turns out, that was just the grocery store talking. I�d been so used to eating those insipid side-split rolls, it took seeing a photo of a lobster roll to remember what a real hot dog buns are supposed to be like.

Don�t get me wrong; if you hand me a hot dog at the ballgame, it�s not like I�m going to throw it back in your face (unless you have Dodger face paint on), but given the choice, this butter-crisped, split-topped bun is the way to go. Thanks to its genius design, the meat and fixings go in the top, which leave three relatively flat sides to toast in butter. How this thing never got patented is the real mystery.

Just be sure to either buy hot dogs large enough to fit your homemade buns, or adjust the size of your rolls to match your favorite wiener. I�m sorry, but people who put short hot dogs on the long buns, and then pinch off the ends of the bread, should be put in jail. Not for life, but at least 3 to 5 years.

You can also make the same number of rolls as you have hot dogs, which apparently is the kind of calculation the hot dog bun industry can�t quite master. Okay, hot dogs come 10 in a package, so let�s do the buns in packs of 8. Seriously, what�s wrong with these people? Anyway, math aside, I hope you give these old-fashioned, split top hot dog buns a try soon. Enjoy!

Please Note: As I mention, this is the exact same dough as our hamburger bun recipe. Click here to watch the official dough video


Ingredients to make 8-10 hot dog buns:
1 package (2 1/2 tsp) dry active yeast (I used Fleischmann's �RapidRise� Yeast)
1 cup warm water (105 F.)
1 large egg
3 tablespoons butter
3 tablespoons sugar
1 1/4 teaspoons salt
1 pound all-purpose flour (*about 3 1/2 cups)
*Note: add a 1/2 cup of the flour to the yeast and water, and then the remainder before kneading

Bake at 375 degrees F. for about 20 minutes, or until golden-brown

Wednesday, 5 March 2014

Whole Wheat Ciabatta � Not Bad, Which is Great!

I�ve never had much of a taste for whole wheat bread, which is not surprising if you grew up during the Wonder Bread years. Whole wheat flour is significantly stronger tasting, and its earthy, bitter aftertaste is the reason white flour is the much preferred choice for, well, everything.

Besides the taste, it�s also a little harder to work with, and fairly easy to turn out something with a density that would make a brick blush. But, thanks to many years of requests, I decided to give the old no-knead ciabatta a higher-fiber makeover. Since I don�t have much whole wheat baking experience, I did what any good chef would do�I didn�t do any research, and just tried to figure it out.

I was quite happy with the taste and texture, and going 50/50 with the all-purpose flour provided just enough of that crusty, chewy �normal� bread experience, and we still get a decent amount of whole grain.

The procedure is straightforward, but as I point out in the video, pay attention to when you start. I recommend doing the sponge in the afternoon, mixing the dough at night, and baking it in the morning. Speaking of which, be sure to dust your dough with flour before covering. I didn�t, and had a little sticking problem.

I know many of you have made and enjoyed the traditional ciabatta bread we posted, so I�m looking forward to hearing from those of you who give this whole wheat version a try. Please let me know, and as always, enjoy!


Ingredients:
For the sponge:
1 cup tepid water
1/4 tsp dry active yeast
1 oz (1/4 cup) rye flour (you can sub wheat flour)
2.25 oz (about 1/2 cup) all-purpose flour
2.25 oz (about 1/2 cup) whole wheat flour
let sit until very bubbly, about 5 hours

Then add:
1/2 cup room temp water
1 3/4 tsp fine salt
1 1/2 tsp honey
1 tbsp polenta
1 tbsp ground flax seed
2 tbsp shelled sunflower seeds
4.5 oz (about 1 cup) all-purpose flour
4.5 oz (about 1 cup) whole wheat flour
-Bake at 450 F. for 30-35 minutes

Sunday, 8 December 2013

Focaccia di Recco � Treating Myself

When I treat myself to a personal �food wish,� it�s usually something I�ve eaten out and become obsessed over, and this episode is a classic case. There�s a Ligurian restaurant called Farina near us, and I�ve become a full-blown focaccia di Recco stalker. 

After watching them make it in front of me so many times, I had to give it a try. It doesn�t look like the focaccia most of us are used to, but come to find out, �focaccia� simply means any flatbread cooked in a hearth, and varies region to region.


This particular example hails from Recco, and is nothing more than some Stracchino cheese trapped in between two, super-thin layers of dough. The dough is nothing more than flour, water, olive oil, and salt; but thanks to a very hot oven, and this probably ancient technique, some serious flatbread magic happens.

As I confess in the video, I was scared to use too much cheese, but I�ll use more next time. At Farina, you can see a thin layer of the molten Stracchino oozing out between the layers. My Crescenza cheesewas basically absorbed, but while you couldn�t see it, you could certainly taste it, and it was amazing.

The obvious question is, can you add other fillings to this? Yes, but don�t. It�s perfect�as long as you find the cheese. Please, find the cheese (no substitutions will be offered #toughlove). 

 By the way, I�m officially recommending the quarter sheet pan seen herein, which is what they use in the restaurant, but I think a round tart pan would work as well. In fact, from what I see online, the round pan seems to be the standard. I can�t wait to try this again, and sincerely hope you give it go as well. Enjoy!


Ingredients for 2 small or 1 large Focaccia di Recco (Tip for first timers: Make a double batch of dough so you have plenty to work with!)
*2 cups all-purpose flour (9.5 by weight)
1/2 cup plus 2 tbsp water           
1 tbsp extra virgin olive oil
3/4 tsp fine salt
*use enough flour to form a soft, but not too sticky dough. Knead for about 5-6 minutes to from a smooth, elastic dough. Let rest 1 hour at room temp.
12 oz Crescenza or Stracchino cheese (6 oz for each focaccia) 
extra virgin olive oil and sea salt, to taste for the top
Bake at 500 degrees F.for about 6-7 minutes, or until well-browned

Tuesday, 19 November 2013

Cream Biscuits � The Best Biscuit to Risk It

Every year, you dream about putting out fresh, homemade biscuits on the holiday table; but fear of failure, and the convenience of those popping fresh tubes, makes it nothing more than an annual fantasy. Then, you found out about these cream biscuits.

Instead of cutting butter into the flour, we�re using butterfat-laced heavy cream, which not only makes the recipe fast and easy, but also produces a biscuit that�s light, moist, and flaky. To that end, try and get some self-rising flour. You can make your own (see below), but for whatever reason, the pre-mixed stuff seems to work better. 

As far as cutting goes, I don�t like to roll the dough too thin just to get more cuts. I do it about 5/8-inch thick, cut six nice biscuits, and then use the trimmings to get 4 or 5 more. You can get 12, but that depends on the exact size of your cutter. The nice thing about this dough is that re-rolling doesn�t seem to damage the texture.

If you do decide to raise your biscuit game this holiday season, maybe think about adding some chopped rosemary or sage to the melted butter. That would add some extra aromatic savoriness, not to mention make your kitchen smell really good. I hope you give these easy cream biscuits a try soon. Enjoy!


Ingredients for 10-12 Cream Biscuits:
2 cups self-rising flour (You can make you own by sifting together 2 cups of all-purpose flour with 1 tablespoon baking powder, and 1 teaspoon fine salt)
1 tbsp sugar
1 1/2 cups heavy cream
2-3 tbsp melted butter
Bake at 500 F. for 10 to 12 minutes, or until well-browned

Tuesday, 5 November 2013

Farinata � Why Didn�t You Wish for This Sooner!

The third best part of this job, after the fame and fortune, is learning about unique, new foods; and this farinata video is a perfect example! Until it was requested by a Vlad Kiperman (if that is his real name), I had no idea this tasty, and dead simple recipe even existed. It�s so good, I�m kind of sad the discovery came so late in life.

Farinata is nothing more than a simple garbanzo bean flour batter, which is spiked with olive oil and salt, and baked in a very hot oven. The surface gets crusty, the edges get crispy, and yet the inside stays moist and sort of creamy. The texture is easy to explain, but the taste, not so much.

This is so simple and subtly flavored that it�s a kind of hard to describe. You may be familiar with the taste of garbanzo (aka chickpeas) in things like hummus and falafel, but here it�s not combined with other strongly flavored ingredients, and so you�re getting pure, un-cut bean. It�s going to be easier for me if you just make it and taste for yourself.

Like I said in the video, if you�ve never made this before, you should probably try a plain version to get an idea of what this stuff is all about, but after that, the sky's the limit. The options for add-ons to the batter, as well as potential toppings are virtually limitless. I hope you give this a try soon. Enjoy!


Pan Note: I know many will ask, so I�ll just say it now; yes, you can use any oven-safe 10-inch pan to make this, but I have a tough time believing it will come out as wonderfully textured as it would if you use a cast-iron skillet. Putting the batter into a smoking hot pan seems to be one of the big keys here.

Ingredients for 6 portions (one 10-inch cast iron pan):
2 cups lukewarm water
1 1/2 cups garbanzo bean flour (aka chickpea flour)
1 1/2 tsp kosher salt (about 1 tsp fine table salt)
1/2 tsp finely minced rosemary leaves, optional
5 tbsp olive oil, divided (use 3 tablespoons for the batter, and 2 tablespoons for the pan)
freshly ground black pepper to taste

Gluten-Free and Loving It


By the way, since this is made from a legume-based flour, farinata is 100% gluten-free, which should make a small, but very passionate group of foodwishers happy. My usually modus operandi when it comes to such requests and questions is a referral to Allrecipe.com�s impressive, and extensive gluten-free recipe collection, or one of my many talented GF food blogger friends. 

Speaking of which, Shauna and Danny from Gluten-Free Girl (the Beyonce and Jay-Z of GF bloggers), have a new cookbook out called, Gluten-Free Girl Every Day. If you happen to swing that way, check it out. The recipes sound wonderful, the photos are gorgeous, and the book�s getting rave reviews.

Thursday, 17 October 2013

Building a Bigger Baguette

People are asking if you can make larger loaves, and the answer is a definite yes. Here you see a batch of dough made into two larger baguettes, which took about 20 minutes to bake, I think. I should have timed it for you, but I was mesmerized by their beauty as I kept peeking to see if they were done, and never checked the clock. It's hardly my fault.

You can also make one giant loaf, but may want to reduce the temperature to 450 F., since the baking time is going to be longer, maybe 35-40 minutes or so. By the way, you can always test with a thermometer, and pull the bread at an internal temperature of 190-200 F. Enjoy!


Wednesday, 16 October 2013

Perfect French Baguette at Home � Only Impossible If You Don�t Try It

Whenever someone asked me why I hadn�t done a baguette video yet, I�d tell them because you just can�t recreate an authentic loaf of French bread at home. 

I�d explain about the water, the flour, the centuries old starters, and the steam-injected ovens. I told them what I�d been told; that it was simply impossible, or as the French say, "impossible!"

That was, until I actually tried to make some. Much to my amazement, not only was it possible, it was really pretty simple. The key is water. That goes for the dough, and the baking environment. The dough must be very sticky, as in hard-to-work-with sticky. This is nothing well-floured fingers can�t conquer, but I did want to give you a heads-up.

Besides the water content in the dough, the oven must also be moist. This humidity, in addition to some occasional misting will give the crusty baguettes their signature look. How does this work? You know how when someone pours water on the rocks in a dry sauna, and suddenly it feels way hotter? It probably has something to do with that.

Anyway, who cares why it works, the important thing here is that real, authentic, freshly-baked baguette is now an everyday reality. One thing worth noting; I adapted this no-knead version from a recipe I found herelast year. The original is in metric, so I�ve converted it, but also included the original flour and water units in case you want to get it exact. I hope you give this easy, and so not impossible baguette recipe a try soon. Enjoy!


For 4 smaller or 2 large baguette:
1/4 tsp dry active yeast (I used Fleischmann's Rapid Rise Yeast)
(Note: if you want to use a traditional bread technique, add the whole package of yeast (2 1/4 tsp) and proceed as usual)
1 1/2 cups water (325 grams)
1 3/4 tsp salt
18 oz by weight all-purpose flour (500 grams), about 4 cups
- Mix dough and let rise 12-14 hours or until doubled
- Punch down and shape loaves, let rise covered with floured plastic 1 to 1 1/2 hr or until almost doubled
- Bake at 550 F. about 15 minutes or until well-browned
- Spray with water before baking, at 5 minutes, and at 10 minutes during cooking time

Friday, 4 October 2013

Cheesy Crackers � The Simple Joy of Homemade Crackers

Making homemade cheese crackers has never been very high on my must-do baking list, but with entertaining season rapidly approaching, I decided to give it a try to see just how vastly superior they are to their store-bought cousins.

I�m happy to report that they are better anything I�ve ever had out of a factory-sealed package. They have a much better texture with more crunch, and way more real, cheesy flavor. The only thing they have less of is ingredients; like by 45 to 5.


By the way, these cheesy crackers are based on a recipe I found on my friend, Joy the Baker�s blog. If you�re not familiar with her fine work, I encourage you to go check her out. She�s one of my favorites!

As far as the cheese goes, I went with three parts sharp cheddar to one part Parmigiano-Reggiano. I�m giving the cheese measurements below in weight, as the proportions to the rest of the ingredients are critical, and as you�ll see in the clip, measuring by cup is highly inaccurate. Since I used a fine grater on the very dry, hard cheese, it looks like well over a half-cup of cheese, but in fact was only one ounce.

This is why when recipes call for a cup of Parmesan cheese, some people will be adding 2-oz of cheese, and others 4-oz, simply depending on how they grated the cheese and packed the cup. But, when portioning cheese by weight, one ounce is always one ounce. 

Okay, I feel better. I hope you give these delicious homemade cheese crackers a try soon. Enjoy!


Ingredients for about 36 crackers:
(Note: This is a half recipe, you should double to make enough for a party)
2 tablespoons room temperature unsalted butter
3 ounces sharp cheddar cheese, grated (about 3/4 cup lightly packed)
1 ounce Parmigiano-Reggiano cheese, finely grated (about 1/3 cup lightly packed)
1/2 tsp paprika
pinch of cayenne
1/4 teaspoon salt
1/2 cup all-purpose flour (2.25 oz by weight)
1 tablespoon cold water