Showing posts with label Dessert. Show all posts

Wednesday, 20 May 2015

Classic Strawberry Shortcake � Thanks, Grandpa!

I was visiting my mom last summer, and overheard her and my aunt talking about making strawberry shortcake using �dad�s� recipe. They were obviously talking about my grandfather, which was surprising, since I had no idea he baked.

I remember he did a lot of cooking growing up, but it was things like frittata, meat sauce, or polenta. I never once saw him bake anything sweet. Nevertheless, he apparently gets credit for inventing our official family recipe for strawberry shortcake, which I�ve adapted here.

What he had done was taken the strawberry shortcake recipe off the box of a certain, very popular premade biscuit mix, and added extra �everything,� as my mother put it. So, that�s what I did here, except instead of using the stuff in the yellow box, I used self-rising flour, which I�m pretty sure is basically the same thing.

The only other major change is the original recipe calls for regular melted butter, but as you�ll see in the video, I like to toast mine just a little, to bring out those subtle, nutty flavors. I'm hoping Armand Cianfoni would approve. I really hope you give �our� strawberry shortcake a try soon. Enjoy!


Makes 6 Large or 8 Normal Strawberry Shortcakes:
2 cups self rising flour ((You can make you own by sifting together 2 cups of all-purpose flour with 1 tablespoon baking powder, and 1 teaspoon fine salt)
1/4 cup sugar
1/4 cup heavy cream
1/2 cup milk
4 tbsp butter, melted, and lightly toasted to a golden-brown

4 pints fresh strawberries
1/2 cup white sugar
*add 1 tbsp water, if strawberries aren�t perfectly ripe
3/4 cup cold heavy cream, whipped with a tablespoon of sugar and a few drops of vanilla (watch demo here)

- Bake at 425F.  for 15-18 minutes or until browned.

Thursday, 14 May 2015

Baked Apple Roses by Any Other Name Are Something Completely Different

Every once in a while, I post a video solely based on something I saw online, and these baked apple roses are the latest example. I saw a photo of these somewhere on social media, and using that one image as my only guide, I whipped up a batch, which was a tremendous disaster.

I assumed that I could figure these out just by looking at the finished product, but that did not happen. I tried doing them free-form, and they completely unraveled as they cooked. I wish I'd taken some photos, but they basically look like they exploded.

So, I decided to find the source of the photo, and see how these are actually supposed to be done, which led me to the blog, Italian Chips. It�s written by a woman named Ana, who�s a Brazilian living in Italy, so I knew I was in good hands.Thank you, Ana!

Other than a couple ingredients, I pretty much followed her technique exactly, except I didn�t use puff pastry.  As I mentioned in the video, I used a new dough I�ve been working on, which is much faster version of puff pastry, that uses biscuit dough. Stay tuned for that, and in the meantime, really hope you give these gorgeous looking, and very delicious apple roses a try soon. Enjoy!

Microwave Note: if you don't have a microwave, just saut� your apple slices in a little bit of butter over medium heat, for about half a minute per side, or until flexible, but not soft. 

Muffin Pan Note: If you use a metal muffin pan instead of a ramekin, I would reduce the heat to 375F., and cook about 45, or until the pastry is well browned.


For 2 Apple Roses:
1 large red apple
2 pieces rectangular puff pastry, rolled less than 1/8-inch thick, about 3� wide by 12 to 14� long
melted butter as needed
cinnamon sugar as needed (1/4 cup sugar with 1 tsp cinnamon)
powdered sugar, optional
- Bake at 400F. for about 45 minutes, or until the pastry is well browned.
- If using metal muffin pan: Bake at 375F. for about 45, or until the pastry is well browned.

Friday, 24 April 2015

Whole-Grain Blueberry Scones � Because a �Muffsconut� Isn�t a Thing

I was brainstorming some ideas for using up a cup of nearly perfect blueberries, and was waffling between muffins, donuts, and biscuits. I finally decided on a biscuit-like triangle, spiced subtly with essence of old-fashioned donut.

I�m calling it a scone because I cut it into a triangle. There�s just something un-American about a triangular biscuit, so you Brits will just have to keep a stiff upper lip about this not being an actual scone.

I used my new favorite, sprouted spelt flour, but I�m guessing this will work with whatever you roll with. You�ll also want to keep an eye on them in the oven, as the baking times will vary depending on the exact shape and thickness. They�re done when they�re well browned, and you see blueberry juices bubbling out through the top and sides.

These have that someone loves me look, especially if you do the recommended sugar-crust top, which is why I�m thinking these would be nice for Mother�s Day, or any other brunch/breakfast-in-bed type situations. I hope you give these a try soon. Enjoy!


Ingredients for 8 Whole-Grain Blueberry Scones:
2 cups spelt flour
1 1/2 tsp baking powder
1/4 tsp baking soda
3/4 tsp fine salt
1/8 tsp cinnamon
1/8 tsp freshly grated nutmeg
2 tbsp white sugar, optional
4 ounces ice cold butter (1/2 cup aka 1 stick) 
1 cup blueberries
3/4 cup cold buttermilk
- 425F.for about 20-25 minutes, or until well-browned and blueberry juices start bubbling out through the top and sides.

Thursday, 12 February 2015

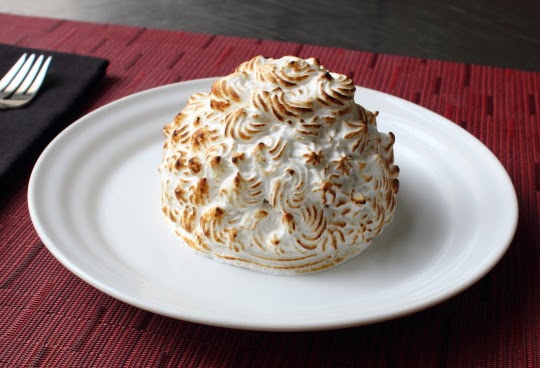
Baked Alaska with a Lighter? You Betcha!

I�ve always wanted to do a Baked Alaska, and with Valentine�s Day coming up, I thought it would be the perfect time to demonstrate this show-stopping dessert. I just didn�t anticipate coming up with possibly the greatest browning meringue hack in history.

As you�ll see in the video, I made two of these, so I could show you a couple different ways to decorate. After browning the first one with a blowtorch, my preferred method, I started on the second, and for whatever reason the torch stopped working.

I was just about to turn on the oven, where you can finish these at 500�F until browned, when I had an idea. I�d just bought a windproof lighter to use when grilling in the backyard, and wondered if the tiny jet flame that shoots out from the tip would be hot enough to do the job. It was, and it did.

As far as the actual recipe itself, there�s really not a lot that can go wrong. As long as you freeze your ice cream cake thoroughly before browning the meringue, and cook your sugar syrup to 240�F, yours will look just like mine, or better.

There are obviously unlimited combinations of cake and ice cream flavors you can use for this, so I suggest consulting with your Valentine, and giving this easy Baked Alaska technique a try very soon. Enjoy!


For 2 Baked Alaska:
Note: You can make these ahead, including the piping, freeze, and then brown the meringue before serving.

1 1/2 cups raspberry ice cream
1/2 cup vanilla ice cream
2 round thick slices chocolate cake

For the Italian meringue:
2 large egg whites
1 tsp lemon juice
- beat to soft peak, and slowly add 240 F. sugar syrup (see below)
- continue beating until you have stiff peaks that will hold a sharp line

For the sugar syrup:
1/2 cup white sugar
1/4 cup water

FLAMBE NOTE: First of all, be careful. Pour an ounce or so of any liqueur (I used brandy but cherry liqueur or Framboise would be even better) into a pan and place on low heat. When it�s warm enough you can it ignite with a lighter, and spoon the flaming liquid over your baked Alaska. Just be sure to turn down the lights!

Friday, 6 February 2015

Fresh Raspberry Sauce � Easy and Effective

As promised, here�s the fresh raspberry sauce we served with our recently posted chocolate decadence cake. While originally intended to be a companion video for that dessert, this stuff is so beautiful and delicious, you and your Valentine may not even need the cake.

Like I mentioned in the video, this will absolutely work even if you use frozen raspberries, but nothing compares to the flavor of the sauce if you can somehow find and use fresh raspberries.

Of course, that�s only half the battle, because the real key, besides the fresh fruit, is not overcooking the sauce.  We don�t want to boil and reduce this mixture. We�re not trying to make a thick heavy syrup, but instead a light, fresh, and vibrant pool of raspberry goodness.

This was perfect with our chocolate decadence, but would be equally as effective with pretty much any quality, store-bought dessert; in particular cheesecake, or vanilla ice cream. I�ve checked with the legal team, and even if you put this on something from the market, you�re still allowed to technically call your dessert "homemade."

By the way, if this gorgeous sauce doesn�t help you seduce the object of your desire this Valentine�s Day, don�t be too upset, as it probably wasn�t meant to be. So good luck, and I hope you give this fresh raspberry sauce a try soon. Enjoy!


Ingredients for about 3 Cups Fresh Raspberry Sauce:
4 half-pint baskets of fresh raspberries (1.5 pounds), rinsed, drained
2 to 3 teaspoons fresh lemon juice, or to taste
1/4 cup sugar, or more to taste
*0 to 4 tablespoons water, depending on desired thickness

*Depending what you�re going to serve the sauce with, you may want to add some water before cooking the berries. If you want something a little thicker, to serve over ice cream for example, then don�t add any water. On the other hand, if you want and lighter texture like I did, toss in a few tablespoons of water before heading to the stove. Be careful; we�re not boiling and reducing the sauce, so we can�t cook out excess liquid.

Tuesday, 3 February 2015

Chocolate Decadence - The Eighties Most Iconic Dessert

This �flourless� chocolate cake was all the rage in the 1980�s, and looking back, it all makes sense. As I vaguely remember, the decade celebrated decadent overindulgence, and this dessert is that, and more. By modern standards, this cake is ridiculously rich. In fact, some of you may find it too intense, but most true chocolate fiends will be in heaven.

This was invented by chef Narsai David, in Berkeley, California, and while close to the original, I bumped up the ingredient amounts a bit, so we can use a standard 9-inch pan.  Also, he doesn�t use cayenne. By the way, if you don�t use the same chocolate I did (milk, white, etc.), I can�t tell you what will happen, because I don�t know.

I dusted the buttered pan with flour, because that�s how Mr. David does it, but my sources in the pastry world tell me that cocoa may be a better choice, since it won�t leave a light film. Doesn�t bother me, but I have to write something for these posts. 

Be careful not to overcook this. It goes for a relatively short time in a hot oven, so while mine took about 14 minutes, you should start checking around 13. The top will be just barely set, with a jiggle below the surface. If it�s really soupy, then leave it another minute and check again.

This is best served very cold. It�s easier to cut, and I enjoy the texture more than at room temp. As I mentioned, stay tuned for the raspberry sauce video, which I�ll post on Friday. That will give you plenty of time to practice both for Valentine�s Day. I hope you give this a try soon.  Enjoy!


Ingredients for one 9-inch cake pan (this is extremely rich cake, so you can easily get 12 to 16 servings):
18 ounces semi-sweet chocolate (62% cacao)
10 tablespoons unsalted butter
1 tablespoon plus 1 teaspoon sugar
1 tablespoon plus 1 teaspoon flour
5 large eggs, room temp, or slightly warm for best results
tiny pinch of cayenne and salt
- serve with ice-cold fresh raspberry sauce

* Bake at 425 F. for probably 12-15 minutes depending on the oven, until just barely set, with a jiggle below the surface. The cake will firm up as it cools.

TIP: If you want to remove your cake from the pan for presentation, just set it in a pan of hot water for a minute, and it will pop right out. 

Monday, 22 December 2014

Edible Holiday Gift Idea: Candied �Buddha�s Hand� Citron

Welcome to our annual homemade edible gift episode, where you finally figure out what to get that �special� (aka super-picky and has everything) foodie on your holiday list. By the way, if you�re a fan of candied citrus, you �ll want to make extra, since Buddha�s Hand is a unique and special treat.

To me this crazy looking fruit tastes/smells like a really fragrant Meyer lemon with hints of grapefruit, and if you can find it, I recommend you give it a go. It�s not cheap, but what is? If you can�t find it, don�t despair; this technique works perfectly fine with strips of orange or lemon peel.

Regarding the blanching step I mention in the video; I heard that pre-boiling wasn�t necessary for this fragrant fruit, as it�s not as bitter as other types of citrus, so I tested it both ways, and I�m glad I did.

The batch I boiled in water first had virtually no bitterness left, and still had a fairly strong citrus flavor. The batch that was candied raw definitely had a more fragrant aroma and vibrant taste, but unfortunately there was a distinct bitter aftertaste.

So, I recommend the boiling step, especially if you�re going to be making this primarily as a candy. If you were going to be cooking with it, in things like fruitcakes, then you could probably get away with the bigger flavor, and slight bitter edge.

Either way, I hope you can get your hands on some of these hands, and give this fun, and easy to make holiday confection a try. Enjoy!


Ingredients for about 2 cups of candied citron:
(warning, I didn�t measure very carefully, but that doesn�t matter here. As long as you have enough simple syrup to cook your citrus in, you are fine)
3 cups cubed Buddha�s Hand citron, washed thoroughly, or other citrus peel, sliced into 1/4-inch strips (simmer in plain water for 20-30 minutes before candying step)
2 1/2 cups sugar (plus extra for tossing the candied fruit in)
2 cups water
- cook on medium heat, stirring, until the syrup reaches 230F.

Tuesday, 9 December 2014

Ricotta Pie � Call It �Cheesecake� At Your Own Risk

You would certainly be well within your rights to call this ricotta pie a �cheesecake,� except then your guests would be expecting cheesecake, and that might cause some problems. 

If you tell me I�m about to get a slice of cheesecake, I�m picturing something tall, dense, sweet, and very rich. Those adjectives are why people order cheesecake in the first place.

That�s why this lighter, less sweet variation is being called a ricotta pie. So much of cooking for people is managing expectations, and a recipe�s name is a big part in that. Moving past semantics, I really enjoyed this cannoli-inspired take on the rustic Italian classic.

I played around with a hybrid pie-dough/cookie crust, with flavors borrowed from a cannoli shell, as well as studded the filling with chocolate and candied orange; also common features of that other ricotta-based dessert. If you don�t want to mess around with my crust, or you�re still trying to do the paleo thing, you can skip that step, and just butter and flour the pan first. Your favorite graham cracker crust will work as well, especially with some ground almonds tossed in.

Regarding the sweetness: Generally, ricotta pies are not very sweet, and contain only about half the sugar of a traditional cheesecake. For this size pie (9-inch), you could use between a 1/4 and 1/2-cup of sugar, depending on your tastes. I used a 1/3-cup, which is perfect for me, but I�m not you, so adjust accordingly. Same goes for the grated citrus, and chocolate. I really hope you give this great ricotta pie a try soon. Enjoy!


Ingredients for 8 portions:
For the crust:
2 cups all-purpose flour
1 tablespoon sugar
1 teaspoon baking powder
1/4 teaspoon fine salt
1/2 cup cold butter, cut in chunks
1 large egg
2 tbsp marsala wine
2-3 tablespoons ice water, or enough to form dough
Prebake crust for 15 min at 400 F.

For the filling
3 cups whole-milk ricotta cheese
4 large eggs
2 large egg yolks
1/3 cup sugar
1 1/2 teaspoons vanilla extract, to taste
1 or 2 teaspoons freshly grated lemon and/or orange zest
pinch of salt (not shown!)
2 tbsp semi-sweet chocolate chips, optional
2 tbsp diced candied orange zest, optional

Bake 45 minutes at 350 F., or until just set (160 internal temp)

*I garnished with chopped pistachios, and some  additional orange zest that I tossed with some simple syrup (1/4 cup water and a 1/4 cup sugar brought to a simmer and allowed to cool.)

Wednesday, 5 November 2014

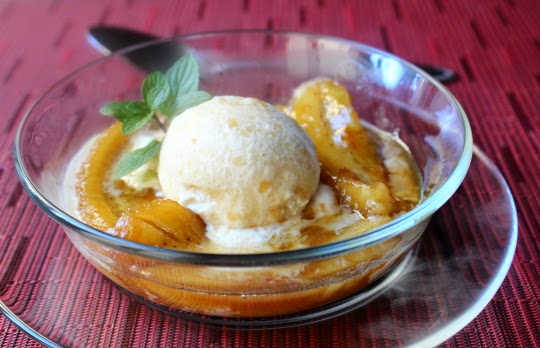
Bananas Foster � America�s Favorite Flaming Dessert

When you think show-stopping, special occasion desserts, you usually don�t think �simple and fast,� but that�s the case with Bananas Foster. This delicious New Orleans classic only has a few ingredients, and takes just minutes to make. Except for the folks that burn their houses down, everybody loves this recipe.

Speaking of which, the best way to avoid that kind of thing is to make sure you have the flame turned off when you add the banana liqueur and the rum. Once in, you have a chance to stand back a little, and you should be fine to flamb�. By the way, if you�re using an electric stove, simply use a long fireplace lighter to ignite.

As I mention in the video, try to find the largest bananas you can for this. We definitely want them to get nice and tender in the rum sauce, but we don�t want them falling apart. Along the same lines, only cook the bananas for about 30 to 60 seconds per side before adding the booze.

That may not seem like much, but by the time the sauce comes together, they�ll be perfect. Another great tip, especially for larger groups, is to scoop the ice cream ahead of time, and keep your bowls in the freezer. You want to spoon over bananas Foster piping hot, and don�t want it cooling down while you�re scooping ice cream for six people.

Of course, in New Orleans they prepare this tableside, which can be a challenge at home, so you�ll have to settle for turning down the lights, and gathering all your guests around the stove to watch the show. I hope you give this great American desert to try soon. Enjoy!


Ingredients for two portions:
2 bananas, peeled, cut in four pieces each
3 tablespoons unsalted butter
3 tablespoons packed brown sugar
1 ounce Banana liqueur (mine was 17% alcohol)
2 ounces rum
2 pinches cinnamon
2 scoops vanilla ice cream

Wednesday, 15 October 2014

Dutch Babies � Almost as Easy to Make as Real Babies!

I had my first "Dutch Baby" in Chicago a few years ago, and have wanted to do a video on them ever since. I�ve always been fascinated by how many different breakfast foods you can create using just milk, eggs, and flour; and this is one of the more interesting examples. Especially considering the unusual, and borderline disturbing name.

Sometimes called �German pancakes,� these have very little to do with Germany, and nothing to do with the Dutch. Apparently they were invented by German immigrants who were referred to as �Dutch;� a corruption of the word �deutsch.� So, save your emails saying they don�t have these in Germany or the Netherlands. We know.  

As I mentioned briefly in the video, I like to use a little less batter than many recipes call for. I think this provides the best crispy-to-custardy ratio. I topped mine with butter, lemon, and powdered sugar, but any and all traditional pancake toppings will work wonderfully. I hope you give these beautiful �babies� a try soon. Enjoy!


Ingredients for 4 small or 2 large portions:
3 large room temperature eggs
2/3 cup room temperature milk
packed 1/2 cup flour (really pack the measuring cup firmly with flour)
1/4 tsp vanilla extract
1/4 tsp salt
3 tbsp clarified butter
- Bake at 425 F. 20-25 min
* garnish with melted butter, fresh lemon juice (Meyer if you can find it), and powdered sugar.

Monday, 29 September 2014

Pumpkin Seed Brittle � Break Some Off This Halloween

This pumpkin seed brittle recipe was a lot easier to make than film. The procedure for nut brittle, or in this case, seed brittle, is very simple, but there are points in the recipe when you have to move fast, which is unfortunate when you have to move a camera and set up shots. 

Even with these challenges, it came out just fine, and I�m only complaining as a way to build confidence. Once your sugar mixture has turned a nice caramel color, you have to immediately turn off the heat, add your baking soda (be careful), then your nuts or seeds (be careful), and hastily mix until combined. As the concoction cools it hardens quickly, so transfer into your pan and press as soon as you can (be careful).

After that, you can relax, unless you are scoring yours into shapes. No pressure, but you only have about two minutes to make your marks. After the brittle is cool, simply break it up, and you�ll be enjoying a crispy, delicious, and very seasonally appropriate treat.

Regarding the salt: you can add it right into the mix like I did, or sprinkle it over the top surface before the brittle is completely cool. That does look kind of cool, but either way, it�s critical, and should not be omitted.

I can�t help you with the tricks, but at least you have one more idea for a treat now. I hope you give this pumpkin seed brittle recipe a try soon. Enjoy!


Makes enough Pumpkin Seed Brittle for 12 witches or 8 zombies:
2 cups white sugar
1/2 cup light corn syrup
2 tablespoons water
5 tablespoons unsalted butter
1/2 teaspoon baking soda
2 cups raw pumpkin seeds (pepitas)
1 1/2 teaspoons coarse sea salt (3/4 to 1 tsp if using fine salt)

Friday, 22 August 2014

Lattice Top Peach Pie � How to Weave Dough Like a Dream

We are right in the middle of peach season, and what better way to show them off, than in this classic, lattice-top pie? And by classic, I mean the peek-a-boo crust design, not the filling, which has a few ingredients that are definitely not classic.

By the way, if you�re peaches are too ripe to peel, then you can remove the skin by cutting an �X� on the bottom and dipping in boiling water. Of course, if they�re really ripe and juicy, you probably shouldn�t be making pie with them anyway. Those are the kind of peaches where you take off your shirt and just eat them over the sink.

Above and beyond beautiful, this lattice design is also very practical. When you�re making pie with something like peaches, the relatively open top allows for lots of moisture to evaporate, which helps prevent the dreaded �watery pie syndrome.� That�s also the reason we boil the excess juices down to a syrup. 

So, whether you use this lattice-top technique for a peach pie, or other juicy fruits, I hope you give it a try soon. Enjoy!


Ingredients for One 10-inch Pie:
about 3 pounds fresh peaches, peeled and sliced (about 2 lbs 12 oz once trimmed)
1 cup white sugar, divided
tiny pinch of salt
1/4 cup flour
1 tbsp cornstarch
pinch of cayenne
1 tsp lemon juice
pinch of cinnamon
enough pie dough for a double crust pie (get recipe here)
- Bake at 350 F. until browned and bubbling. Mine took about 1 hour 15 minutes, but I peek a lot)

Sunday, 10 August 2014

Happy National S'mores Day!

I just heard on CNN that today is National S'mores Day. I've never done an actual s'mores video, but we did do this delicious ice cream pie inspired by them. I'm not around a lot of campfires these days, but when do I get a craving, this frozen version does the trick. Follow this link if you want to check out the original post, and get ingredients. Enjoy!

Tuesday, 29 July 2014

Green Tea Mochi Ice Cream � Is This Even Close?

What�s my favorite kind of recipe to post on Food Wishes? Any recipe that I�ve never tried before, and this green tea mochi ice cream is a perfect example. In the kitchen, there�s nothing quite like the thrill of having no idea what you�re doing.

I�ve had it many times in restaurants, and have always been fascinated by its unique combination of taste and texture, but I had absolutely no clue how it was done. I basically still don't, but regardless, this was my first attempt and I look forward to lots of criticism.

I probably should've done a little more research, but I glanced at a few recipes, and decided to just go for it. Remember, these early experiments can yield a lot of great experience, especially if it�s a totally failure. Happily, this wasn�t. All in all, I think it came out very well.

I went with green tea flavored mochi, and while I usually see it paired with green tea ice cream, I decided to go with plain vanilla, and really enjoyed how the subtle, aromatic bitterness of the tea plays off the sweetness of the ice cream.

By the way, if you don't use the glutinous rice flour this will not work. You can�t substitute regular rice flour, as it doesn't produce the same texture, or so I'm told. Anyway, let me know how I did, or more likely didn�t do; and I really hope you give it a try soon. Enjoy!

UPDATE: Apparently the reason they use corn and potato starch when shaping is that raw rice flour has more of a bitter flavor. Must have brushed off most of mine, since I didn't really notice an off flavor, but I will be using the other starches next time. Thanks for everyone's input!  


Ingredients for about 10 Green Tea Mochi Ice Cream Balls:
(I did 8, but there is enough to make a few more)
1/2 cup glutinous rice flour
pinch salt
1/2 cup cold water
2 tbsp sugar
1 tsp green tea powder (matcha)
10 small scoops ice cream of your choice (about 1 1/2 cups worth)

Monday, 30 June 2014

Boozy Strawberry Blueberry Cheesecake Popsicles and the Pursuit of Happiness

Is there any better way to celebrate the birth of our great nation than with these red, white, and sort of blue popsicles? Before you answer, I should mention they�re actually strawberry and blueberry cheesecake ice pops, and also spiked with booze.

Like much of our country, these are very simple, and get a little more interesting when you add a few shots of alcohol. I used vodka for its neutral flavor, but my scientist friends tell me any liquor will work just the same. However, be sure to measure carefully, since too much or too little alcohol and/or sugar syrup will adversely affect the frozen texture.

I didn�t want anything too icy, and it�s the alcohol and sugar that keeps this from freezing rock solid. If you leave out the booze, you�ll get a firmer ice pop, so you�ve been warned. I�m not sure how to adjust to compensate, so you may want to grab a regular fruit ice pop recipe on Allrecipes.com and use it instead.

I joked about our Founding Fathers being proud of this particular pursuit of happiness, but the more I think about it, I bet they would have been; especially that Ben Franklin guy. Dude liked to party. So, whether you make these on the 4th of July, or not, I really hope you give them a try soon. Enjoy!


Ingredients for 6 Boozy Strawberry Blueberry Cheesecake Popsicles:

For the simple syrup:
3/4 cup sugar
1/2 cup water
(This makes extra. Use it for lemonade and ice tea)

For the strawberry layer:
1 1/3 cup trimmed and quartered strawberries
1 1/2 tablespoon simple syrup
1 1/2 tablespoon vodka

For the cheesecake layer:
4 ounces (1/2 cup) room temp cream cheese
1 1/2 tablespoon simple syrup
1 tbsp vodka

For the blueberry layer:
1 1/3 cup trimmed and quartered blueberries
1 1/2 tablespoon simple syrup
1 1/2 tablespoon vodka

Tuesday, 24 June 2014

Blackberry Almond Buckle � You May Want to Loosen Your Belt

First things first; this type of rustic dessert is called a buckle because of how the fruit sinks into the buttery batter as it bakes, and �buckles� the surface with its juicy weight. 

I believe you�ll find my completely made-up explanation in the video a little more interesting, but regardless of the etymology, this blackberry buckle is no joke.

I added a handful of almond meal, since I had it around, and I think almonds and blackberries have a thing for one another. It seemed to work out nicely, although it did make things a little denser; which in this kind of thing isn�t necessarily a bad thing. 

Same goes for the toasted nuts on top. Leave them off it you want, but I liked the crunch. I was going to tell you to use any berry you want, but I changed my mind. This really needs to be done with blackberries. Raspberries are a little too delicate; as are strawberries, and blueberries are barely berries to begin with. For me, it�s blackberries or bust. I really hope you give this a try soon. Enjoy!


Ingredients for 8 Portions Blackberry Buckle

3 cups fresh blackberries
2 tbsp white sugar if your berries are sweet, 3 if they need some help
1 tsp vanilla extract

For the batter:
1 1/4 cups all purpose flour
3/4 cup white sugar
1/2 cup almond meal
2 tsp baking powder
1/4 tsp salt
pinch of cinnamon
1 cup milk
8 x 12 baking dish with 6 tbsp hot melted butter poured in.

- Bake at 350 degrees F. for about 1 hour

Sunday, 8 June 2014

Coconut Oil Coffee?

My friends at Allrecipes.com posted this very intriguing video for what they�re calling �Coconut Oil Coffee.� As some of you may know, I�ve recently admitted to having a coconut oil and coconut milk obsession, so I really want to try this, but before I do, I thought I�d find out if any of you have tried this strange brew yet. Well, have you? If so, I�d love to hear what you thought. I�ll probably try it anyway, but thought it�d be fun get some of your opinions first. Thanks in advance!

Tuesday, 27 May 2014

Strawberry Ice Cream � This is So Not Cheating

Many people consider this type of strawberry ice cream recipe a �hack� or a �cheat,� because we�re skipping the more time-consuming and sometimes temperamental egg custard step; but even if I didn�t want to save time, and possibly eggs, I�d still prefer this method.

To be clear, I�m only speaking about this specific flavor of ice cream. For deep, dark chocolate, or butter pecan, I�ll take the classic French-style every time. But, for sweet, juicy strawberries, I�m not a big fan of the subtle egginess you get with the traditional method.

For me it muddles the fruitiness, and coats the tongue a bit too much. When I eat a bowl of this on a blazing hot summer day, I want nothing but pure strawberries and cream goodness. To achieve that you need to include a lot of strawberry puree, and all that extra liquid means the texture will not be quite as luxurious. It�s minor sacrifice.

Feel free to skip the 10-second blending of the cream, but I like how it very slightly thickens the mixture. A few seconds too long however, and you�ll have whipped cream, which is going to give you a frozen mousse effect; not something I�m into personally.

By the way, rumor has it that these make some pretty spectacular ice cream sandwiches, if you can get your hands on some shortbread cookies. So, as we head into another long, hot summer, I hope you give this fast, simple, and very delicious strawberry ice cream recipe a try. Enjoy!


Ingredients:
12 ounces trimmed strawberries (one of those baskets should get you close)
3/4 cup white sugar
very tiny pinch of salt
1 tsp vanilla extract
1 cup milk
2 cups heavy cream