Showing posts with label Rice. Show all posts

Monday, 4 May 2015

Lamb & Rice Stuffed Grape Leaves � Hours to Make, Seconds to Eat, Totally Worth It

There�s no getting around the fact that these lamb and rice stuffed grape leaves, aka �dolmas,� take some time and effort to put together, but at least they�ll all be gone in just a few minutes. What I�m trying to say is, maybe make a double batch.

If you order these at your favorite Mediterranean restaurant, you�ve probably enjoyed the more common meatless version, but I really do love the lamb in these. The technique works the same no matter what you use, but of course, how much rice you use will affect how much liquid you need.

As far as the grape leaves go, I�ve only done these with the ones in the jar, which work great for me. I�ve heard these are even better with fresh grape leaves, but where the heck am I going to get my hands on those in Northern California?

As I mentioned in the video, these are wonderful at any temperature, which makes them a great option for parties. You can put them out warm, knowing that they�ll be just as delicious when they are cold. I garnished mine very simply with lemon and olive oil, but any cold yogurt sauce makes for a beautiful dip. I really hope you give these a try soon. Enjoy!


Ingredients for about 32 Lamb & Rice Stuffed Grape Leaves:
1/2 pound ground lamb
rounded 1/2 cup long grain rice
1/4 cup olive oil, plus more for drizzling
1 tablespoon currants
1 tablespoon pine nuts
1 1/2 teaspoons kosher salt
1 teaspoon ground black pepper
1/2 teaspoon ground cumin
1/4 teaspoon ground cinnamon
1/4 teaspoon dry oregano
2 tablespoons chopped mint
1 large egg
1 jar (16-oz) grape leaves, drained and rinsed

To cook the �Dolmas:�
4 cups chicken broth (tip: use already hot to save time)
Juice of one lemon
drizzle of olive oil

- Simmer, covered, gently for about 45 minutes or until rice is tender. I usually check at around 35 minutes, and play it by ear from there.

Thursday, 19 March 2015

Avgolemeno Soup � Totally Epic

Avgolemeno is one of those soups that I�ve made many times, but rarely from scratch. It�s usually a �there�s nothing in the house� type of thing, made with a carton of broth. Even in its quick-and-easy form, it�s a delicious, and comforting meal, but when you use a fresh, whole chicken, it becomes epic.

By the way, I mean �epic� as in ancient Greek poetry, not hipster clich�. Okay, I mean it both ways. Speaking of whole chickens, that�s your big decision here. If you want chicken meat in your soup, then you�ll only want to simmer the bird for about an hour, or just until cooked through.

This way you get a nice broth, and the meat will still be flavorful when you add it back in. If you don�t want meat in the soup, which by the way, is how my wife Michele much prefers it, then keep simmering until the chicken falls apart and all the flavor has been extracted into the broth.

Some recipes call for orzo pasta in this, but I like the Arborio rice. I think it gives just the right amount of starchiness and body, but any rice or small pasta will work here. The perfect amounts of lemon and egg are also up to you, and experimentation is recommended. I really hope you give this classic Greek soup a try soon. Enjoy!


Makes 6 Servings Avgolemeno Soup: 
1 whole chicken, about 3 pounds
3 quarts cold water
2 tsp salt at least, plus more to taste
1 onion, chopped
1 carrot, chopped
2 ribs celery, chopped
2 bay leaves
1/4 tsp dried oregano leaves
2 tbsp extra-virgin olive oil
2 cups finely diced onion
2/3 to 3/4 cup Arborio rice, depending on how thick you like it
1/2 cup fresh lemon juice
2 large eggs
1/2 tsp freshly ground pepper
pinch of cayenne

Monday, 16 February 2015

Mardi Gras Special: Red Beans and Rice � Comfortably Yum

Any time someone asks the question, �What exactly is soul food,� the answer should always be a comforting bowl of red beans and rice. Just sit them down, give them a spoon, and when they finish, ask them if they understand. They will.

Like I say in the intro, there are thousands of ways you can make this, using all sorts of smoked pig parts and sausages, but there are really only two ways you can serve it � thin and soupy, or thick and creamy.

Once you slowly simmered your beans, and they�re very, very soft and tender, and your meats are falling apart, you�re ready to serve. If you ladle it up as is, you�ll have something that�s fairly loose, with most of the beans still whole. It�s great like this, and based on my travels to New Orleans, the more common style.

However, another popular technique is to smash and stir some of the cooked beans into the mixture as you continue cooking. This creates a much thicker, and creamier consistency, which I really enjoy when I want something a bit more substantial. It�s closer to a chili texture, and I love how the rice sticks to it.

This is totally up to personal taste, so if you�ve never made it before, try some on rice as soon as the beans are tender, and it�s still pretty juicy. Check it out, and then, if you want, you can continue cooking/smashing/stirring to end up closer to where I did.

Regardless of how thick you make yours, you�ll want to soak your beans overnight in cold water before starting the recipe. If you forget, which you will, you can always use the quick method. Bring the beans to a boil in large pot of water, turn off the heat, and let it sit there for an hour or so to soften up, and become easier to digest.

If you put enough meat in it, this is more than a meal, but it also makes a great side dish for barbeque, or pretty much anything. Throw in some collard greens, and maybe some cornbread, and let the good times roll. I hope you give this easy, red beans and recipe a try soon. Enjoy!


Ingredients for 8 portions:
1 tablespoon vegetable oil
12 ounces Andouille sausage, sliced or cubed
1 cup finely diced onion
3/4 cup finely diced celery
3/4 cup finely diced green peppers
4 cloves minced garlic
1 teaspoon freshly ground black pepper
1 smoked ham hock
2 bay leaves
1 teaspoon dried thyme
1/2 teaspoon cayenne pepper, or to taste
2 quarts chicken broth or water, plus more as needed to adjust consistency
1 pound red kidney beans, soaked overnight
about 2 teaspoons kosher salt, or to taste
hot sauce to taste

Monday, 5 January 2015

Crispy Fried Boudin Balls � De-Casing A Cajun Classic

The first time I had Cajun-style boudin sausage, I was confused. I�d ordered something called �sausage,� but that�s not what I got. Instead of the firm, meaty tube I was used to, I was served a tough, rubbery casing filled with a soft, wet, paste-like meat and rice mixture.

It had pork and alligator in it, among other things, and had I not been in one of the most famous restaurants in New Orleans, I�d have thought the chef had done something drastically wrong. It was incredibly delicious, but the texture, and the fact you had to squeeze it out of the casing to eat, took some time for me to process.

I�ve come to understand how and why it�s done that way, and it�s become one of my favorite foods. However, since the casing is nothing more than a delivery system, I much prefer to form the boudin into balls, and fry them as seen herein.

The textural contrast between the crispy outside and moist, savory inside is a wonder to behold. The taste is just as impressive. Intensely flavorful and satisfying, these boudin balls would win any Super Bowl food table on which they appeared. Hint, hint.

Just don�t leave out the liver! I know you �hate� it, but I don�t care, put it in anyway. It makes this wonder of American cuisine what it is. I really hope you give these boudin balls a try soon. Enjoy!


Ingredients for about 48 Boudin Balls, depending on the size:
1 3/4 lbs boneless pork shoulder, cut in 1-inch cubes
6 ounces chicken livers, cut in 1-inch pieces
1 yellow onion, diced
2 celery ribs, diced
1/2 cup diced poblano chili or green bell pepper
1/2 cup diced jalapenos (seeded first)
6 garlic cloves, minced
3 tablespoons kosher salt (1 1/2 to 2 tbsp if using table salt)
1 1/2 tablespoons black pepper
1 teaspoon chili powder
1 teaspoon cayenne
4 or 5 cups fully-cooked white rice,
1/2 cup fresh chopped parsley
1/2 cup fresh chopped green onion
Enough seasoned flour, beaten eggs, and plain breadcrumbs to bread the balls

- Fry at 350 F. for 3-4 minutes until browned, crisp, and hot inside.

Wednesday, 3 December 2014

Persian Rice � Sorry, Measuring Cups

I believe I�ve posted a few �fool proof� methods for cooking �perfect� rice, but this Persian version takes the grand prize, and it�s not even close for second. The beauty of this method is that it doesn�t rely on any specific measurements, or even exact times. This will make some of you very nervous, but just go with it.

As long as the pot you use to boil and steam the grains is large enough, this will work exactly as shown. Since we are basically steaming rice that�s already been par-boiled and drained, there are never any issues with too much, or too little water.

By the way, I�ve only made this a handful of times, and so I�m sure there are many things I could improve on. I hear that soaking the rice in cold, salted water before boiling it helps improve the texture even more, which I find kind of hard to believe.

I mean, is there a level of rice perfection that goes beyond perfection? Probably too deep a question for a food blog about rice, so I�ll simply close by saying, I hope you give this Persian rice a try soon. Enjoy!


Ingredients for 8 Portions:
2 cups basmati rice, rinsed very well
3 quarts water, brought to a boil with 3 tablespoons of salt
2 tablespoons olive or vegetable oil
1 russets potato, peeled, cut into 1/4-inch slices
salt to taste
pinch of ground cumin
5 or 6 slices of butter for top
pinch of saffron, ground and mixed with 1 1/2 tablespoons hot water
parsley to garnish 

Wednesday, 6 August 2014

Bok Choy Steamed Rice � You Can Taste the Unconventional Wisdom

With all the fancy, grilled summer meats flying around, it�s easy to forget about the side dishes. Nobody wants to spend hours in the kitchen, when they could be outside playing volleyball in jhorts, but with this easy bok choy rice, you can have something way more interesting in the same time as it takes to make plain rice.

I believe we�ve covered this before, but yes, I�m cooking the stems about 15 minutes more than is fashionable. I love a crisp stalk of bok choy as much as the next guy, but here we kind of want it to melt into the rice. Conventional wisdom says to cook quick, but I wanted a softer, sweeter, and more subtly sulfuric grain. Think braised cabbage rolls if you�re still having a problem.

By the way, if your rice package says 2 parts water to 1 part rice, ignore it. Too much water is the main reason people screw up rice. I find 1 1/2 cups of water to each cup of long grain rice works way better, especially in dishes like this. So, ignore those directions, and give this delicious side a try soon. Enjoy!


Ingredients for 4 portions:
1 1/2 cups cold water
1 cup long grain rice
1 large bok choy, separated, and sliced
1 tsp soy sauce, plus more to taste
1/2 tsp toasted sesame oil
1 tsp sambal chili sauce
toasted sesame seeds to garnish

Friday, 9 August 2013

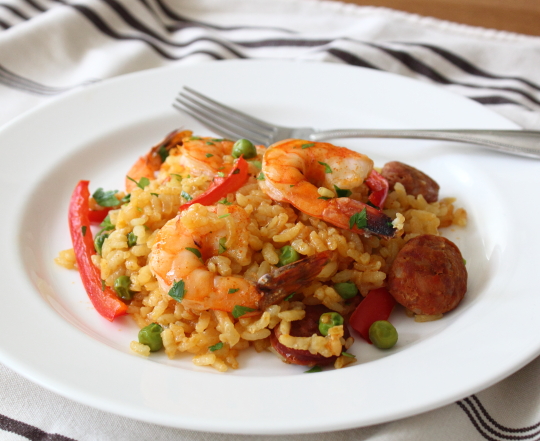
Sausage & Shrimp Paella � Before You Run, You Walk, Or In This Case, Crawl

When I first do a version of a classic dish like paella, I try to use a minimum of number of ingredients and steps so we focus on the technique. So, while you experienced paella makers will probably find this quite unremarkable, it really is intended for the first-timer. 

Real paella is not baked, but cooked on top of a fire, which results in a similarly textured rice to what you see here, except a layer caramelizes onto the bottom of the pan, and those gloriously crunchy bits are considered the best part. So, basically I�m telling you we left out the best part.

The trade-off is that this method eliminates most of the finesse and monitoring required by the traditional method. Consider this a gateway paella, and the first step to a serious, lifelong addiction. Besides the method, ideally you�ll use a wider variety of ingredients; things like clams, mussels, squid, chicken are all very commonly used, and will make your rice that much more interesting.

No matter how you cook you paella, one thing you must try to include is the saffron. Besides the short-grain rice, this is probably the most key addition. Unfortunately, the flavor and aroma are almost impossible to describe, so you really need to experience it yourself to fully understand. I�ve heard it described using things like �earthy metallic honey,� and �rusty champagne,� but these really don�t do it justice.

Anyway, if you�ve never tried to make paella before, I really hope this inspires you to give it a go. The Arborio we use here is easy to find in the big grocery stores, and as long as you stick to the liquid/rice ratio, there�s not a lot that can go wrong. And like I said in the video, stay tuned for my future attempt at a more classic version. In the meantime, I hope you give this quick and easy paella a try soon. Enjoy!


Ingredients for 4 large portions:
(best to use a 12 or 13 inch wide skillet)

For the saffron broth:
2 tsp olive oil
reserved shrimp shells from 1 pound of jumbo shrimp
1/2 to 1 tsp saffron threads, depending on how strong you want the flavor
2 1/4 cups chicken broth
*Simmer for 20 minutes, strain and reserve. Be sure to season generously with salt, or your rice will be bland.

For the paella:
1 tbsp olive oil
8 oz sliced chorizo sausage, or any smoky, spicy sausage
1/2 yellow onion, diced
2 cloves garlic, minced
1 1/3 cup Arborio rice
1/2 cup green peas
1 tsp regular or smoked paprika, optional depending on how much was in the sausage
2 cups (exactly) hot saffron broth, or just plain hot chicken broth
1 pound peeled and deveined jumbo shrimp
1 sweet red pepper, cut into thin strips
salt and cayenne to taste
garnish top with a light drizzle of extra virgin olive oil, and freshly chopped Italian parsley
lemon wedges, optional (some love lemon, I prefer without, but give it a try and see)

*Bake at 425 degrees F. for 20 minutes, then finish over med-high flame until rice is just tender. It will be firm and slightly sticky. Don�t burn it, but you can leave it on the flame a little longer to try and get the rice to caramelize and crust onto the bottom of the pan, like the classic version. Be careful.